Color Block Painting: Crisp Shapes With Painter’s Tape
Plan three to five flat color blocks, then use painter's tape the right way: press it, seal it with the base color, paint away from it and peel at a low angle for clean edges.

Tutorial at a glance
Materials
- Acrylic paint in 3 to 5 colors
- Painter's tape, 1 in (25 mm) wide
- Flat brush, 1 in (25 mm)
- Small flat brush for corners
- Pencil and ruler
- Plastic card for pressing tape
A color block painting is one of the few projects where patience matters more than brush skill. The whole design is a handful of flat shapes with straight edges, and painter’s tape does the drawing for you. What separates a crisp result from a fuzzy one is a short list of habits: press the tape, seal it, paint away from it, and peel it at the right moment.
This tutorial covers that sequence on a stretched canvas or a wood panel. If you have not prepared a canvas before, start with the basics in simple canvas wall art, then come back for the taping method.
What you need
- A stretched canvas or primed wood panel. The example uses 16 x 20 in (40 x 50 cm).
- Acrylic paint in three to five colors, including one light base color.
- Painter’s tape, about 1 in (25 mm) wide. A low-tack tape made for delicate surfaces is the gentlest on fresh paint.
- A flat brush, about 1 in (25 mm), plus a smaller flat brush for tight corners.
- A pencil, a ruler, and a plastic card or spoon for pressing the tape down.
Plan three to five blocks
Sketch the canvas shape on scrap paper several times, small, and divide each one differently. Three to five blocks is the comfortable range. Fewer than three can look unfinished, and more than five starts to produce thin slivers that are fiddly to tape.
A few things make a layout read well:
- Unequal sizes. Let one block take up roughly half the surface and let the others share the rest.
- One angled line. A single diagonal among verticals and horizontals gives the piece movement. More than two and the design starts to look busy.
- Light next to dark. Put your lightest and darkest colors beside each other somewhere, so at least one edge has strong contrast.
Pick the sketch you keep looking back at and copy its lines onto the canvas lightly in pencil, using the ruler. These are your own shapes, so adjust them until the proportions feel right to you. If you would like sharper, more repeating geometry, the layout method in geometric triangle wall art uses the same taping steps on a grid.
Paint the base color first
Cover the entire canvas, including the sides, with your lightest color. This does two jobs. It becomes one of your finished blocks, and it gives the tape a smooth, sealed surface to grip instead of raw canvas texture.
Apply two thin coats rather than one thick one, and let the base dry completely before any tape touches it. Drying time depends on the paint and the room, so check the label and then wait a little longer than you think you need. Tape pressed onto paint that is only dry to the touch can lift it later.
Tape and press the edges
Lay the tape along your pencil lines. Keep in mind which side of the line the tape sits on: the tape covers the area you want to protect, and its edge is the line you will see. For blocks that share an edge, you paint one, let it dry, and then move the tape over to cover it before painting the neighbor.
Run the tape past the edge of the canvas and down the sides so the line continues around the corner. Then press along the working edge of each strip with the plastic card or the back of a spoon. Fingers alone leave small gaps, especially on canvas weave, and those gaps are where paint bleeds.
Seal the tape edge with the base color
This is the step that makes the biggest difference. Before you paint the new color, brush a thin coat of the color already under the tape (the base color, on the first pass) along the edge you just pressed.
Any paint that sneaks under the tape now is the same color as what is already there, so it is invisible. As it dries, it fills the tiny gaps and blocks the next color from following. Let this sealing coat dry to the touch, roughly as long as the label suggests for a thin layer.
Paint away from the tape
Load the flat brush lightly and start each stroke on the tape, pulling it into the open area. Brushing toward the tape pushes paint against the edge and under it. Brushing away from it drags paint off the edge instead.

Keep the coats thin. Two or three thin coats give a flatter, more even block than one heavy coat, and a heavy coat builds a ridge against the tape that can tear when you peel. Let each coat dry to the touch before the next one. Paint the canvas sides to match the block that meets them, or leave them in the base color for a framed look.
Peel at a low angle while the paint is slightly soft
Do not wait for the last coat to cure hard. The best moment is when the paint has lost its wet shine but still feels a little soft, usually within several minutes of the final coat, depending on the product and the room.
- Lift one end of the tape with a fingernail.
- Fold it back on itself so it lies almost flat against the canvas.
- Pull slowly, at a low angle, away from the freshly painted block.
- Stop if the paint film starts to stretch or lift with the tape.
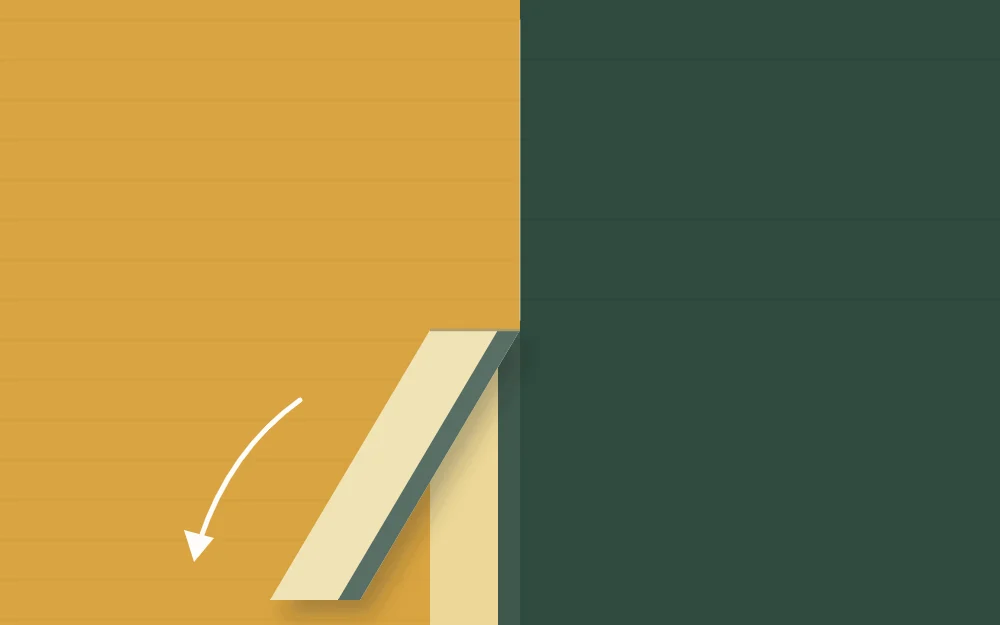
If the paint has already dried hard and begins to lift, run the tip of a craft knife lightly along the tape edge to score the film, cutting away from your hand, and then keep peeling.
Watch out
Tape left on overnight bonds more firmly and is more likely to pull paint with it. Plan each session so that the tape goes on and comes off the same day.
Fixing small bleeds
Even with sealing, a small bleed can happen. Let everything dry, then choose one of these fixes:
- For a tiny bump, touch it out with a small flat brush and the color of the block it intruded on.
- For a longer wobble, re-tape along the correct line, seal with the color under the tape, and repaint that edge only.
Taking it further
Once the method feels reliable, the same blocks can run across more than one canvas. Carrying a diagonal over two or three panels is covered in painting a diptych or triptych, and taped edges make the alignment between panels easy to control.
Frequently asked questions
Why does paint bleed under painter's tape on canvas?
Canvas has a woven texture, so tape rarely sits perfectly flat and paint can travel along the tiny channels beneath it. Pressing the tape firmly and then brushing a thin coat of the color already under the tape along its edge fills those channels before the new color goes on.
When should I remove the tape from a color block painting?
Peel it when the final coat has lost its wet shine but still feels slightly soft. Fold the tape back on itself and pull slowly at a low angle. If the paint has hardened and starts to lift, score lightly along the tape edge first.
How many colors work best for a color block design?
Three to five colors is a comfortable range for a first piece. Include one light color, one dark color and one or two mid tones, and let one block be clearly larger than the rest so the layout has a calm area and a focal point.