Arches and Circles: Geometric Wall Art With Simple Curves
Draw clean arches, circles and half circles with string, a pencil and a few bowls, then paint them or cut them from paper. Includes centering, even band widths and three balanced layouts.
Tutorial at a glance
Materials
- Heavy paper, 200 to 300 gsm
- Pencil, eraser and long ruler
- Non-stretch string and a pushpin
- Bowls or lids for tracing
- Acrylic paint and a small flat brush
- Or colored paper, scissors and a glue stick
Curves are the friendliest shapes in geometric work. A piece of arch wall art needs only two kinds of line, a straight side and a half circle, yet it reads as calm and deliberate from across a room. Circles and half circles belong to the same family, so you can combine all three without the composition feeling crowded.
The only real challenge is drawing a clean curve at a useful size. A piece of string, a pencil and a pushpin solve that, and a few kitchen bowls cover the smaller shapes. Once the curves are on the page, you can paint them or cut them from colored paper.
What you need
- Heavy paper, about 200 to 300 gsm, or a primed canvas panel. The example is 12 x 16 in (30 x 40 cm).
- A sharp pencil, a soft eraser and a long ruler.
- Non-stretch string or thin twine and a pushpin.
- A scrap of thick cardboard or foam board to pin into.
- Bowls, plates or lids in two or three sizes.
- Acrylic paint and a small flat brush, or colored paper, scissors and a glue stick.
Choose a composition before you draw
Three arrangements cover most of what curves can do. Sketch each one as a thumbnail the size of a playing card and pick the one that suits your wall.
- Nested arches. Three to five arches sharing one center point, each smaller than the last, like a rainbow with straight legs. Calm and symmetrical.
- Offset half circles. Two half circles facing each other but shifted sideways, so their flat edges only partly meet. More movement, still simple.
- Circle on a block. A full circle resting on, or hovering just above, a rectangle. The most graphic of the three and the quickest to make.
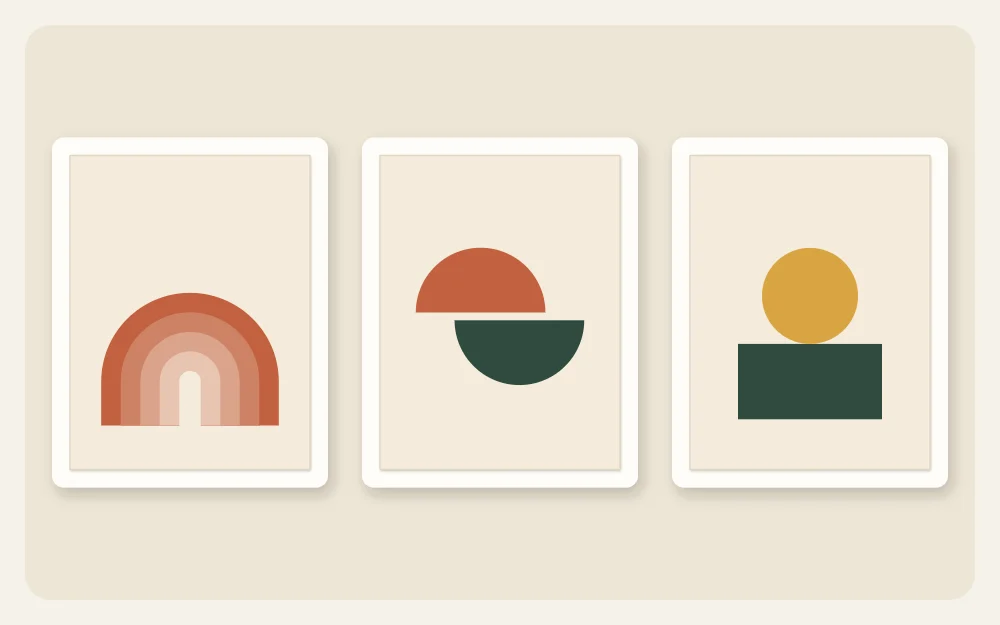
These are starting points; change the number of bands or tilt a half circle and the design becomes your own. If you prefer straight edges, the same thumbnail habit works for triangle compositions.
Find the center and mark your guidelines
Curves look wrong quickly when they sit off-center, so spend a few minutes on light pencil guides.
- Measure the width of your sheet and mark the halfway point at the top and bottom. Join the marks with a faint vertical line.
- Decide where the arches begin to curve. Draw a faint horizontal line there, called the spring line. On the example sheet it sits about 7 in (18 cm) up from the bottom edge.
- The point where the two lines cross is the center for every nested arch.
- Leave a margin. A border of about 1.5 in (4 cm) keeps the outer arch from crowding the edge or disappearing under a frame.
Draw large curves with string and a pencil
Lay the sheet on the cardboard scrap and push the pin through the center point. If you would rather not pierce the sheet, tape a small square of card over the center first and pin into that.
- Tie one end of the string to the pin. Tie a small loop in the other end, sized so the pencil tip lands exactly on your chosen radius. For the example, the outer arch has a radius of 4.5 in (11.5 cm).
- Hold the pencil upright in the loop, pull the string taut, and sweep from the spring line on one side, over the top, to the spring line on the other.
- Shorten the string by the width of one band and draw the next arc. Repeat until you reach the smallest arch.
- Use the ruler to drop straight legs from the ends of each arc to the base line.

Tip
String can stretch and slip. A strip of stiff card with a pin hole at one end and a row of pencil holes at measured distances makes a steadier compass, and the holes set your band widths for you.
Keep the band widths even
Even bands are what make nested arches look finished. Pick one width and stick with it: 0.75 in (2 cm) works well on a sheet this size, with a thin gap of about 0.25 in (6 mm) between bands if you want the background to show.
Write the radii down before you start: 4.5, 3.5, 2.5 and 1.5 in for four bands with gaps, for instance. Measuring each radius from the center, rather than from the previous line, stops small errors from adding up.
Trace bowls for circles and half circles
For shapes under about 8 in (20 cm) across, tracing is faster than string. Turn a bowl upside down, hold it firmly and trace around the rim.
To find the center of a traced circle, cut the same circle from scrap paper, fold it in half twice, and use the crease point as a guide. One fold gives you a half circle template with a true straight edge.
Line traced circles up with your vertical center line, or move them clearly off it. A circle only slightly off-center tends to look like a mistake.
Paint the shapes or cut them from paper
Painting
Work from the outer arch inward, with the sheet turned so your hand pulls the brush along the curve rather than pushing it. A small flat brush held on its edge gives the cleanest line. Let each band dry before painting its neighbor; drying time varies, so check the label on your paint. The flat-color methods in the guide to color block painting apply here as well.
Cutting paper
Draw each band on the back of colored paper, cut it out with small scissors in long, slow strokes while turning the paper rather than the blades, and glue it to the background. Paper gives crisp edges with no brush control needed, and you can shuffle pieces around before committing.
For color, graduated tones of one hue suit nested arches well, lightest on the inside or the outside. The guide to choosing a color palette for wall art covers how to build that range.
Stack shapes so the piece feels balanced
Curved shapes look as if they have weight, so treat the layout like a stack of objects that should not tip.
- Put the widest or darkest shape low. Arches standing on a block of color feel grounded.
- Keep a circle above an arch smaller than the arch’s inner opening, so it reads as an accent.
- Leave more empty space above the stack than below it. Equal margins can make the design look as if it is sliding down.
- Limit yourself to three kinds of shape. Variety comes from size and tone.
Frequently asked questions
How do I draw a large arch without a compass?
Pin one end of a non-stretch string at the center point, loop the other end around a pencil at the radius you want, and sweep the pencil over the top with the string pulled taut. A strip of stiff card with a pin hole and pencil holes does the same job with less wobble.
Why do my nested arches look uneven?
The usual cause is a center point that moved between arcs, or radii measured from the previous line instead of from the center. Write down each radius first, measure every one from the same pin hole, and compare band widths at the top and both sides before adding color.
Is it easier to paint arches or cut them from paper?
Cut paper is usually easier for a first attempt because scissors give a crisp edge and you can rearrange the pieces before gluing. Painting takes steadier brush control along the curves but gives a flatter, more unified surface. Both start from the same pencil guidelines.