Paper Collage Wall Art: Composing With Cut Shapes
Build an original abstract collage from shapes you cut yourself. Learn how to cut a related family of shapes, test arrangements dry, overlap them, glue without wrinkles and press the piece flat while it dries.

Tutorial at a glance
Materials
- Heavy base paper, 250 to 300 gsm
- Colored or painted paper in 4 to 5 colors
- Sharp scissors
- Craft knife and cutting mat
- PVA glue or glue stick
- Flat glue brush and scrap paper
- Baking parchment and heavy books
Paper collage wall art is one of the most forgiving ways to make an abstract piece. Nothing is fixed until the glue goes on, so you can slide shapes around for as long as you like and only commit when the arrangement feels right.
The project here is an original composition built from shapes you draw and cut yourself. There is no template to follow. A small family of related shapes, a limited set of colors and a patient gluing method are all it takes.
Pick or paint your papers
Collage works with almost any paper, but two things make the job easier: a sturdy base and papers that do not buckle when damp.
- Base sheet: heavy paper or thin card of about 250 to 300 gsm, in white, cream or a pale tint. It has to stay flat under several glued layers.
- Colored paper: solid-color craft paper of about 120 to 160 gsm cuts cleanly and glues flat.
- Painted paper: brush acrylic paint over plain drawing paper and let it dry fully; check the label for the drying time. Visible brush marks give the shapes a handmade surface that printed paper lacks.
Limit yourself to four or five colors: two main ones, one neutral, one dark and one small accent. A tight palette is what makes loose shapes look as though they belong together.
Cut a family of shapes
The strongest collages use shapes that are clearly related. Choose one idea, such as soft rounded forms, and stay with it. Draw your own outlines freehand on the back of the paper, or skip the pencil and cut directly, which gives livelier edges.
A useful starter set:
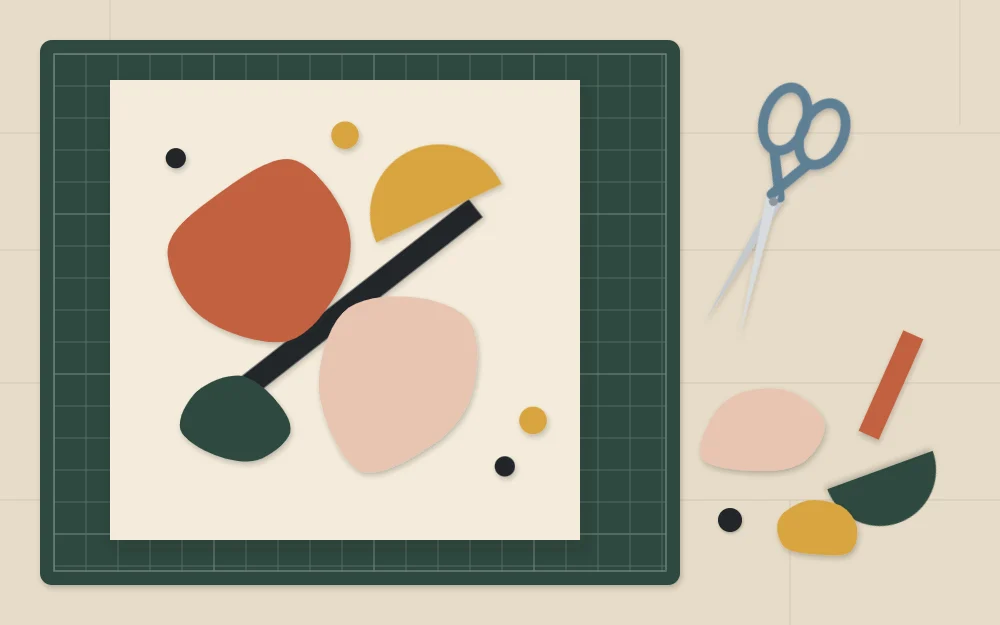
- Two or three large rounded blobs, each different
- One half circle
- One long strip, slightly uneven in width
- Four or five small dots or ovals
Cut more than you need, in several sizes. Spare shapes give you choices during arranging, and the offcuts are often worth keeping too: the curved sliver left behind after cutting a blob can be more interesting than the blob.
For curves, keep the scissors still and feed the paper into them with your other hand. Use a craft knife on a cutting mat for inside curves, cutting away from your hand.
Arrange dry before you glue
Lay the base sheet flat and place the shapes on it without any adhesive. This stage deserves the most time. Begin with the largest shape, set it off center, then add the medium shapes, and finish with the small accents.
Three arrangements are worth trying, because comparing them shows what the piece needs:
- Crowded in the center. Everything clusters together with empty space all around. It often feels tight and static.
- Spread to the edges. Shapes scatter evenly across the sheet. Nothing leads, and the eye has nowhere to rest.
- Balanced with open space. One main group sits off center, a smaller element answers it on the other side, and a clear area of base paper is left open.
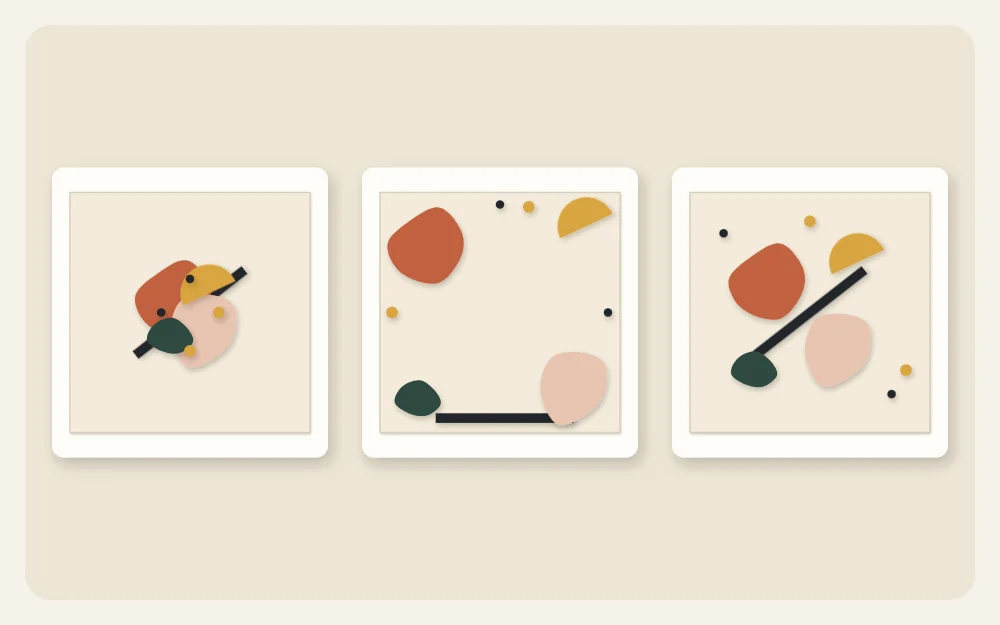
Most people settle on a version of the third. The reasons behind it, including focal points and size hierarchy, are explained in wall art composition basics.
When an arrangement works, take a quick snapshot with your phone, or trace lightly around two or three key shapes in pencil. You will need that record once you lift everything off to glue.
Overlap with purpose
Overlapping is what separates a collage from a set of shapes on a page. Where two papers cross, they create a new edge and a sense of front and back.
- Overlap clearly. Let one shape cover a good portion of another, not just a hair’s width.
- Put lighter or larger shapes underneath and darker, smaller ones on top, so nothing important is buried.
- Leave at least one shape standing alone, touching nothing. It gives the busy area something to contrast with.
- Let one element run off the edge of the base sheet, then trim it flush from the back once the glue is dry.
Glue flat without wrinkles
Wrinkles come from too much moisture. Paper swells when wet and shrinks as it dries. A thin, even coat of glue is the whole secret.
- Work from the bottom layer up. Lift off the top shapes and set them aside in order.
- Place a shape face down on scrap paper. Brush a thin layer of PVA glue from the center out past the edges, or use a glue stick for thin papers.
- Move the shape to the base, lower one edge first, and smooth it down toward the opposite edge with clean fingers.
- Cover it with a sheet of scrap paper and rub firmly from the center outward to push out air.
- Wipe away any glue that squeezes out with a barely damp cloth, and switch to fresh scrap paper for the next shape.
Watch out
Glue on the front of colored paper can dry shiny. Keep one hand for gluing and one clean hand for placing, and change the scrap sheet often.
Press it while it dries
Even a carefully glued collage tends to curl as it dries, because one side of the base is damp and the other is not. Pressing solves that.
Lay a sheet of baking parchment over the finished piece so nothing sticks, then place it on a flat surface under a stack of large books or a board. Leave it for several hours, or overnight, checking the glue label for the drying time. Lift the parchment after about twenty minutes to make sure no glue has seeped through, then put it back.
Finish and frame
Once dry, erase any pencil marks and trim the outer edge with a ruler and knife if shapes overhang. A mat with a generous border suits collage well, since it adds open space and hides the trimmed edge.
Collage behind glass stays cleaner, and the frame presses the paper flat. When hanging it, weigh the framed piece, identify your wall type, and use hardware its manufacturer rates for both, following the package instructions.
Where to go next
Cut edges give collage a crisp, graphic look. For something softer, torn paper landscape art uses the same gluing method with rough, feathered edges. The approach also carries over to textiles: fabric scrap collage wall art swaps paper for offcuts and adds texture you can feel.
Frequently asked questions
What glue is best for paper collage?
PVA glue brushed on in a thin, even coat suits medium and heavy papers and dries clear. A glue stick is easier for thin papers because it adds very little moisture. Whichever you use, apply less than you think you need and press the piece flat while it dries.
How do I come up with shapes for an abstract collage?
Start from one simple idea, such as rounded forms or leaning rectangles, and cut several versions in different sizes without measuring. Cutting directly with scissors, with no pencil line, gives the most natural edges. Keep the offcuts as well, since the leftover negative shapes often fit the composition.
Why did my collage curl after gluing?
The base paper absorbed moisture on one side and shrank unevenly as it dried. Use a heavier base, apply thinner coats of glue, and press the finished piece under books with parchment on top. A collage that has already curled can often be flattened by pressing it for a day or two.